Monday 31 December 2012

In the nick of time: Reverse 100 thing challenge


I do better if I have a set number, a limit, something concrete to aim for. 

I decided to do the Reverse 100 thing challenge, and added an extra bit along the way. Complete the challenge before the new year. I started this on the 27th December.

And I have!! I just counted them, and the grand total, including things that I had already decided to get rid of, is.....


140!!!!

Woah. I was thinking to myself, never will I get to 100 this evening. I even overshot my target! 

I've been hampered by my lack of photo taking opportunities (being at work full time and arriving home in the dark). So I've got a badly-lit-flash-gone-off-messy-photo of all the items. It will have to do! :)


This feels great. I am ready to take on a New Year, to continue to question my belongings, and be free of all this stuff that I see everywhere I go. I will probably do this again in early 2013! My ultimate dream is to reduce my personal belongings to a total of 200. Never again do I want to make 7 car trips just for my stuff when I move house. 

I'm excited for what the New Year will bring. I have a long project list to keep me busy, and will look forward to making some regular blogging time! 

In the mean time, I wish you all the very best for 2013, and I also want to thank my readers for the support and comments these past few months.


HAPPY NEW YEAR!!!
  

Monday 24 December 2012

Christmas


I've radically simplified my Christmas this year. I've made my own decorations for my very first Christmas tree, and made do with what I had in the house to decorate. I've baked some half-moons (or affectionately known as jam-clams in my house), that I will show you at some point. I have spent very little money this year, and I like it. I haven't visited a shopping centre once. I haven't been stressed out trying to find that last minute present. 

I've been so much more relaxed this year. 

I want to show you some home made decorations for the tree, and been given by my family members.


1. Crochet Christmas star, from this pattern. Made with red and white yarn held together. 
2. My grandma is a genius at wrapping presents. Most years I find a lovely decoration on the outside of the present. 
3. Crochet Christmas star, made with twine. I like the country look.
4. Another star, made from curling ribbon. It has a sheen to it that I like.  


5. A lovely little angel made by my cousin. I got two for Christmas last year, and they get to go on my new tree in 2012.
6. A felt heart, another from grandma, another present decoration. Two felt hearts joined together with blanket stitch. 
7. A felt candy cane, two pieces of felt joined together with blanket stitch. 
8. My little felt reindeer. Again, two felt pieces joined together with blanket stitch. 

I made 7 and 8 by printing out stencils online, and cutting out felt pieces. Once I'd made a few stitches, I used the end of a small crochet hook to stuff it with polyester toy filling. It gives them a bit of shape and rigidity. 

I found some little 10p candy canes in the local sweet shop, to have some edible decorations:


We're in Norfolk this year for Christmas, and we brought the Christmas tree with us. I've put it up with my Tesco value fairy lights and my IKEA battery powered stars. 


Not bad, for my first year of decorating my own tree. Finally, I'd like to wish you all a very Merry Christmas. I hope you all have a wonderful time with family and friends. And eat a lot of yummy food. 


Wednesday 28 November 2012

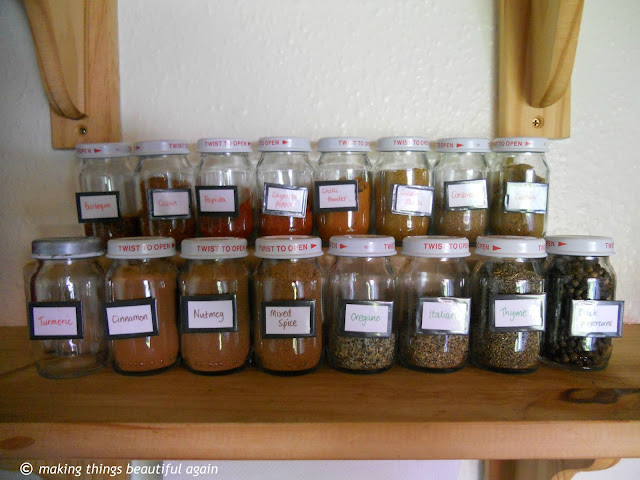
I love my spice rack!


I got the idea for my spice rack from this lovely post.

Here is what I started with:


I've had this arrangement throughout my whole student life, 7 years in total, because it was easy to transport, and pull out of the cupboard to find the spices I needed. But a pile of jars that don't match and have the labels hidden doesn't make it easy to find anything! 

I'd seen some cheap jars in Tesco, too bad they contained a "food" that can't really be called food, and I was rather embarrassed walking up to the till with 16 jars of this horrible stuff. Actually, embarrassed is an understatement!


Everything about it. The look, the texture, the smell, the ingredients, was DISGUSTING. I'm glad I saved someone from eating something a cat would turn it's nose up at. 

But then I did buy 16 jars of the stuff, and I probably increased the demand for the things 10x. I hope not. 

I started by emptying all the jars, straight into food waste, and soaking them in water to remove the labels:


I then sterilised them in the oven at 150C for about 30 minutes. 

These jars were the perfect size, and the perfect price for my small budget. At 32p a jar, the embarrassment of buying 16 and the smell from emptying them was worth it to have the spice rack that I've wanted for so long. 

Next it was time to make labels. I made temporary labels that can be removed because I wasn't certain that I'd always have the same spices. I wanted these but I was reluctant to spend money, and making your own is always more fun. 

I cut out some rectangles from white and black card:


And then wrote the name of the spice in green (herbs), red (spicy spices), and brown (other spices e.g. cinnamon). Excuse the blurry picture next!


I then wrapped them in sticky back film, to protect them from dirt and water. I attached the labels to the jars with blu tack, because I couldn't think of another option. 


That's enough writing, time for before and after pictures! 


The spices are so easy to find, easy to see, and easy to see when we need more. We buy our spices from a brilliant shop called Scoopaway and you can buy just the right quantity by the scoop, and it's about a 1/3rd of the price of buying them at the supermarket!! 


Plus, spices lose their flavour if you don't use them much, so before, that might have meant buying a whole jar, even if you only want 1 teaspoon! So, this new solution is working very well indeed, because we can buy as little as we need for our recipes! 

It was great to get inspiration to turn a simple food jar into a place to keep my spices. These are perfectly functional, and I still like the labels. They're easy to identify, and I've arranged my spices in colour order! :) 

I want/need your help now though! I want to do something to the lids of these jars. I don't really mind them at the moment, but I tried making one of them silver, and it really didn't work. In the absence of money for spray paint and the consideration for food safety, I don't really know what to do with the lids?


Ideas people, I need ideas! Let me know in the comments!


Monday 26 November 2012

The bag dispenser I always wanted

I'm digging out some old photos of a great crafty project. It took me about an hour with the sewing machine, and I love it. It works a treat in our kitchen!


When we moved in 6 months ago, we had plastic carrier bags EVERYWHERE. I wanted a functional but crafty bag dispenser to go in my kitchen, so those plastic bags would not go exploring the insides of my cupboards! 

I went on a hunt for a simple, cheap pattern to make a fabric bag dispenser. Ta Da! I found this lovely design

Off I went, searching through my fabric bits and bobs. This big square of bright green fabric is a thrifted piece - I don't really buy new fabric unless it's on double discount!


I love the brightness of it, and the flowers. The pattern said to cut a 6" x 42" strip of fabric. My piece just happened to be 42" wide. I cut a 7" strip to make it a little wider. 


Then I followed the pattern, sewed up both sides, and added a tunnel for the ribbon to go in. 


I get these bits of ribbon from the fat quarter packs I buy sometimes, and I always save them. Perfect little hanging loop for the bag dispenser. 

First of all, I started out with a cardboard tube for my plastic bags, an idea I found on Pinterest. It didn't work so well. I'll show you a comparison!


The first one I had was just difficult to use, and difficult to refill. Not ideal at all. The new one, however, is brilliant! It goes well with the colours in the kitchen, and matches my tea towels EXACTLY!

I have bright yellow colour pops in mind for my kitchen, but I might wait til we move again to really decide. 


What do you think of my not so new bag dispenser?


Sunday 4 November 2012

Project 333 Season 1 List


I've wanted to write this post since I started Project 333, and now a month into the first season, I'm ready to share my list. The following list is all I'm wearing from October 1st-December 31st 2012. 

I've finally tweaked my list and written up the final version of it (I was supposed to have done this first week of October, oops! P333'ers you'll know what I mean!!). 

Using the collage above as a guide, from top left (moving down by rows):

1. Waterproof jacket
2. Warm coat
3. Long pure wool Icelandic jumper (hand-knitted by my great aunt).
4. Pink lacy scarf
5. Blue cowl
6. Pure wool black shawl (hand-knitted by my grandmother <3 )
7. Pure wool headband 
8. Handbag
9. Pure Icelandic wool gloves
10. Hiking shoes
11. Black flats
12. Blue suede trainers
13. Brown knee-high leather boots
14. Dark grey cowl-neck jumper
15. Light grey button jumper
16. Long colourful dress top
17. Navy floral dress top 
18. Grey short sleeve dress top 
19. Fuschia stripy top, 3/4 sleeves
20. Oatmeal long sleeve top
21. Black cardigan
22. Purple long sleeve top
23. Navy long 3/4 sleeve top
24. Black t-shirt
25. Purple stripy t-shirt
26. Light blue strappy top (excuse the wrinkles!) 
27. Black work trousers
28. Black work trousers
29. Bootcut jeans
30. Skinny jeans
31-33. (not pictured) 1 pair tights, 2 pairs black leggings. 

I made a collage of some of my outfits, if anyone needs some inspiration. I can make so many different combinations with those 33 items, because they ALL go together. Some of the pieces are great for layering too. Here are 4 outfits:


Column 1-2: My go-to weekend/socialising outfits
Column 3: Typical work outfit. I'm lucky that it's business casual. I obviously don't wear it that wrinkly!! 
Column 4: Casual weekend outfit, for grocery shopping etc. 

All the above can also be mixed and matched, to make more outfits! 

I think these are my favourite combinations. Since I started, I have switched out a few that I didn't want to wear, or seemed less practical. My white button down shirt is now reserved for interviews, since the dress code is business casual at work. I am not comfortable in a white shirt, like at all. Luckily, all the clothes above are neat enough to go to work in (except the denim), so I get to use most of my favourite pieces! 


What I've learned from this project:


  • I don't need a lot of clothes to feel good in what I wear. 
  • Sometimes, I wish I had more variety, but I stop myself and remember, "there is more to life than clothes".
  • I feel much better having fewer options. Too many are overwhelming.
  • So far, I almost haven't noticed that I have 33 items total to wear. 
  • I don't want to buy new clothes for a long time. I don't need to. 
  • A simpler life is a better, happier life.


I'll say it again:


A simpler life is a better, happier life


Tuesday 23 October 2012

Taming the paperwork monster

This post is part of my September challenge (even if it's October!). I aimed to organise/declutter one small area of my home each day for the month of September (and did ok, until other things got in the way!).

The topic of this post is paperwork. Bills, certificates, bank statements, any sort of important document. I used to have mine in four different places, and each time I'd need a piece of paper, I'd have to remember which category it was in, and where that category was stored. Once I decided to overhaul it, it became one big pile, and stayed that way for a few weeks. Eventually, I'd had enough and devoted a long afternoon to the job. 

I used Brooke from Slow your Home's guide to banishing the paper clutter. It's amazing, so well thought out and easy to follow. I just noticed it was posted on my birthday, which makes it even more amazing. Just sayin' ;)

I started by collecting everything and dumping it all on the floor in the living room. Every single file and bit of paper I could find. This is what I came up with:


Confusing? I think so. As luck would have it, I knew exactly where to find different bits of paper, but in the effort to simplify my life, I wanted it all in one place. My new filing system is based around an idea I found at the Complete Guide to Imperfect Homemaking.

I tried to find a suitable basket, but as I'm not willing to spend any money on my projects, I  searched around the house first, and found a box that was the perfect width. It's made out of thick cardboard. I bodged a banana crate from a supermarket, I basically cut out the middle part to shorten it and stuck it back together!


I then covered it in brown paper to hide the holes, and all that sticky tape! I wanted something plain and simple, because the suspension files I had available are bright red. It's no good having clashing colours (not for me anyway).

I followed Brooke's guide step by step , did all three days work (3 parts) in 5 hours and was so satisfied when I got it done. I shredded a tonne of paper that I didn't need, and finally got everything into one place:


I had the opportunity to test this out tonight. I needed a bank statement, and it was so easy to find because this box sits in the corner of my living room, and it's the only place now where I store paperwork! I was even able to put it back in its place, which I must say is an achievement for me! 


Do you have a paperwork monster lurking in your house?


Saturday 13 October 2012

Has it really been this long?


I realise I haven't posted anything here in a long time. I'd best update you on what I've been doing! 

When I last posted, I'd just begun the Project 333 quick start course. I thought I would be able to do both my September Challenge and the course, but I didn't know about the project 333 course until after I'd started my monthly challenge. So, things got a bit hectic, and I ran out of time. 

Project 333, in short, involves selecting 33 items of clothing, including jewellery, outerwear and accessories to wear for 3 months. Every quarter you change up your selection to match the season. 4 seasons, starting Jan 1st, April 1st, July 1st and Oct 1st. The rest that falls outside of the 33 gets boxed up for the next change-in-season.

As I am on a journey to simplify my life, the course was a great opportunity to become accountable for the challenge, and get involved with a community on the same path. Things are much more fun if you do them with others! Joining the course was a great experience, I am still connected to approx 200 people all over the world who are simplifying their wardrobes, and learning to live with less.  

Some photos I took during the course:


The three piles of clothes for Week 1 homework, and the donate bags after the first week. 30 items total gone to charity!


This is my wardrobe for  Oct 1st - Dec 31st. 

29 on the bed....


...Four pairs of shoes


total = 33


This is what my drawer looks like now.


This is the only one with day-clothes in, the others have make-up and pyjamas. 

I love this! It is so easy to find what I'm looking for. 


I'm now two weeks in to the first season of Project 333. I was scared that I wouldn't be able to last the 3 months, but I'm more confident now. There is more to life than clothes, and with these choices I don't have to worry about feeling uncomfortable, or whether they look good on me. That is because, I ONLY chose items that fit well, look good and suit my style. 

In other news:


  • I started a new job on October 1st, temporary to begin with, but hope to go permanent. Hence, less blogging time. 
  • I have got a few more posts lined up that belong with the September challenge. 
  • and several others for little things I've been doing in my flat. 
  • I am committed to having and living with less stuff. Most of the projects here will be done with what I already have in the house, and preferably without spending anything. 
  • I'm trying to juggle two blogs now, but I am going to try my best to keep coming here with craftiness! 

Have you been doing any big projects lately?


Monday 17 September 2012

September challenge - halfway!

This post is part of my September challenge. I am organising/decluttering one small area of my home each day for the month of September. 

I've been doing my daily decluttering challenges, and it's working well! Sometimes I do two if I'm feeling impatient or bored, or my challenge for the day is too easy.

I wanted to update you on progress, because my flat is getting way too full of the stuff that I'm getting rid of, I'm running out of space for it! 

The original post is here. But let's pull the list over and cross out all the ones that are done! The ones in blue link to posts about those areas.


1. Bathroom shelf (we keep toothbrushes, mouthwash, floss etc. on here)
2. Bathroom cabinet (extra shampoos, shower gels, lotions)
3. Cupboard under the kitchen sink
4. Food cupboard (we only have 1 to store all dry goods/groceries)
5. Cereal and tea shelf
6. Cutlery drawer
7. Kitchen counter (main counter)
8. Kitchen counter by window (lots of random things end up here)
9. Beauty products (lotions, medications, hair products etc.)
10. Floor of the wardrobe
11. On top of the wardrobe
12. Pyjamas
13. Sides of the wardrobe (can you tell things are crammed into every crevice in my flat??)
14. Suitcase full of clothes (that I boxed up when I started Project 333)
15. Crate of clothes (also boxed up due to Project 333)
16. Linen cupboard (also where we keep lounge wear, hoodies etc.)

17. Bedside table
18. Winter clothes box
19. Hallway - small storage cubbies
20. Hallway - Top 3 large shelves
21. Hallway - Bottom 3 large shelves

22. Books in the living room
23. Paperwork
24. Dropzone (where we dump our stuff when we come in the house)
25. Sewing box
26. Sentimental/keepsakes box (yikes! I'm most scared of this one)
27. Junk corner (random things accumulate here)
28. Junk bag in the study (leftover from previous organising)
29. Craft shelves in the study
30. Box of DVD's and books


That leaves 12 areas for the next 12 days to tackle, and then my flat should be looking a whole lot less cluttered! Can't wait! 

Next I will show you the pile of stuff that is currently on it's way out of the flat.


Yep. I'm still in shock. That HAS to be a car load. One less car load that we'll have to move next time! (as long as I can stop it creeping back!). I also took a suitcase full of random stuff to the charity shop this morning!

That big pile includes:

2 laptops
3 big bags full of clothes/linens etc. one destined for the tip.
a whole lot of CD's
Lots of office supplies and stationery
Cleaning materials that I stopped using and swapped for my own home-made one
3-4 pairs of shoes. My clothes really belong in another post!
some books
and some stuff from the kitchen we don't need. 

I will feel so much lighter once all of this is gone. There might be more to come in the next 12 days, because the challenge isn't finished yet! 

I'm already thinking up the next challenge for October :D


I have to say I think challenges like this are great, because I actually get things done. I spent ages and ages just thinking and writing plans about it. 

Have you been stuck in the planning stages with a project? Maybe now is the time to set yourself a challenge for the next month!


Wednesday 12 September 2012

4 reasons to use a thrifty green cleaning solution

When I moved to my new place 3 months ago, I decided I didn't want to use chemical cleaners in my kitchen. I hate the smell of them. Really strong cloying smells give me a headache, and they can't be good for the airways. I mean all-purpose cleaners from the supermarket, Flash and all those. Furniture polish is particularly bad. ugh. 

So I made my own, with some very basic ingredients. Here's why:


1. It does a better job of cleaning my surfaces than any chemical based cleaner I've tried.

2. If it gets into food preparation (i.e. because it's on the surface), it is perfectly safe. No poisoning or such things going on. 

3. It's cheaper to make than any of the store-bought cleaners.

4. It's super easy!


Here's how:


You will need:

1. An empty spray bottle (if you don't have one I think they'd be pretty cheap to buy from a pound shop. And you can use it again).

2. A bottle of white vinegar (from 49p in Tesco). The brown stuff might stain things!

3. A bottle of concentrated lemon juice. (40p up I reckon)

4. Tap water

5. (optional) Your favourite essential oil - lavender and tea tree are antibacterial so they would be good choices.


These ingredients will make approx 2.5L of cleaning solution, all for under 1 pound (2 if you need to buy the bottle). NICE!!


Here's how:

1. Take your empty spray bottle and fill it about a 5th of the way up with white vinegar. The bottle in the pic is 750ml - go to the white line. No need to be exact here (I'm guessing 100-150ml vinegar)


2. Then add probably about 3-4 tbsp of lemon juice. I never measure it, I just glug some in. 

3. Fill up to the top with water

4. Add about 10 drops of essential oil if you want (I don't).

5. Close the bottle and shake it up!


If you don't like the smell of vinegar, add more lemon juice, or more essential oil to satisfy your nose. Personally, I don't mind the smell, and it dissipates pretty quickly. 


The benefits:

  • It's green and won't harm the environment
  • It's super cheap and easy to make
  • It cuts grease better than any product I know (even the ones that claim to on the bottle). For super-duper greasy stuff (like cooker hoods) use a solution of hot water and soda crystals - do wear gloves though as it can irritate sensitive skin. Then you'll discover the real colour of your appliances! :) 


That's it!  SHAKE IT UP  and clean away!!


If you'd like some more green cleaning tips, post a comment! Also, Slow Your Home has some pretty good green cleaning advice! 


Saturday 8 September 2012

Quick post: Easiest, cheapest kitchen roll holder

I thought of this as I was walking to the park! 

You will need:

Kitchen roll, some twine or string, and a thinner cardboard tube (optional really). That's it!


Then decide where you want to put it - you need two points to attach your twine to. Attach one end: 


I live in a rented flat so I can't put nails or hooks anywhere (but you could of course). Luckily, there was a tiny gap between the shelf and the wall, so I threaded the twine through with a needle, and made a knot in it so it wouldn't fall down. 


Next, put your thinner cardboard tube onto the string. It will help the kitchen roll move more freely. I tried it without, and it's still ok (in case you don't have a thinner tube spare -I think mine came from a roll of baking parchment, cut to size). 

Then add the kitchen roll and attach the twine to the second point. Attach it in a way that allows you to easily remove it, when you need to change the roll. 

I did this:


I wrapped it round the shelf and tied a little knot in it. But not too tight so I can get it off when I need to change the roll. 

And voila, my new kitchen roll holder! For the cost of pennies!


One less thing that lives on the kitchen counter!

I'll share a post on the spice jars soon. I'm really happy with how this turned out! 

What thrifty things have you been doing? 


Thursday 6 September 2012

Sorting through the beauty products

This post is part of my September challenge. I am organising/decluttering one small area of my home each day for the month of September.


By beauty products I'm referring to all make-up, lotions, creams, moisturisers and medication that I own. 

I've recently become interested in the ingredients list on these products.  Chemicals. Unnatural names for unnatural substances. Something concocted in a chemistry lab. How do we know what these are doing to us?

One particular ingredient that has had a lot of attention are parabens. They are used in lots of products, as a preservative. These chemicals mimic oestrogen, and who knows what that might be doing. Alternatives might take some searching for, but they are out there. I found a good article that reviews some products made from natural ingredients. The GoodGuide has more in-depth analyses, but doesn't feature many products I find in the UK. 

For this little project, I started by collecting EVERYTHING in my whole flat that falls under the scope of this challenge. This is what I found:


The goal was to fit all of this into my two bedside table drawers, shown above, and the two lilac baskets which live in the top drawer of my dresser. I use the contents of those baskets every single day, and they are very accessible there. 

Then I sorted everything into categories. 


oh and my make up (why aren't there 5 picture collages?) 


I'll briefly outline what I got rid of from each category:

1. Hair: Duplicates of products that I use very rarely. I had two combs and two hair brushes. I only need one of each. 

2. Lotions: Any containers approaching empty and that had been open for over a year.  Anything that used to smell nice, but now smells off. You'll know. Anti-bac hand gel that attracts wasps and bees (lavender). I am phobic of wasps! 

3. Nails: I love painting my nails. I managed to get rid of 4 bottles  - the colours I won't wear anymore (black, bright red and princess pink). 

4. Meds: Anything out of date. I trimmed down meds for conditions we hardly ever suffer from.

5. Make-up. I'm not a big fan of caking make up on so it's an inch thick. I found an eyeliner that was more than 10 years old, and surprise surprise had parabens in it. I don't think they're supposed to last that long! Chemical breakdown + my eyes = not a good combo. 

In the end I managed to empty the plastic crate, so now I can fit everything in the two drawers and two baskets. Yay!

In future, there is a definite one-in-one-out policy in place. I will have to surrender something I have already if I want something new. That way, hopefully, the drawers won't overflow!

Also, every new product will be researched. If I buy less of them, I might be able to afford to spend a teensy weensy bit more to avoid the nasty chemicals. 


How do you feel about the synthetic ingredients?