Wednesday 28 November 2012

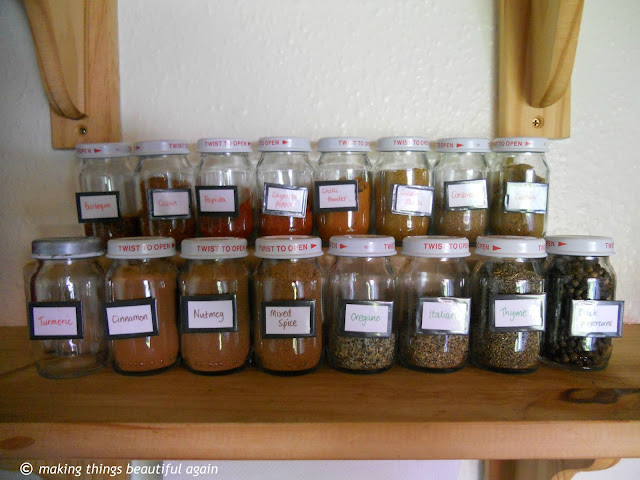
I love my spice rack!


I got the idea for my spice rack from this lovely post.

Here is what I started with:


I've had this arrangement throughout my whole student life, 7 years in total, because it was easy to transport, and pull out of the cupboard to find the spices I needed. But a pile of jars that don't match and have the labels hidden doesn't make it easy to find anything! 

I'd seen some cheap jars in Tesco, too bad they contained a "food" that can't really be called food, and I was rather embarrassed walking up to the till with 16 jars of this horrible stuff. Actually, embarrassed is an understatement!


Everything about it. The look, the texture, the smell, the ingredients, was DISGUSTING. I'm glad I saved someone from eating something a cat would turn it's nose up at. 

But then I did buy 16 jars of the stuff, and I probably increased the demand for the things 10x. I hope not. 

I started by emptying all the jars, straight into food waste, and soaking them in water to remove the labels:


I then sterilised them in the oven at 150C for about 30 minutes. 

These jars were the perfect size, and the perfect price for my small budget. At 32p a jar, the embarrassment of buying 16 and the smell from emptying them was worth it to have the spice rack that I've wanted for so long. 

Next it was time to make labels. I made temporary labels that can be removed because I wasn't certain that I'd always have the same spices. I wanted these but I was reluctant to spend money, and making your own is always more fun. 

I cut out some rectangles from white and black card:


And then wrote the name of the spice in green (herbs), red (spicy spices), and brown (other spices e.g. cinnamon). Excuse the blurry picture next!


I then wrapped them in sticky back film, to protect them from dirt and water. I attached the labels to the jars with blu tack, because I couldn't think of another option. 


That's enough writing, time for before and after pictures! 


The spices are so easy to find, easy to see, and easy to see when we need more. We buy our spices from a brilliant shop called Scoopaway and you can buy just the right quantity by the scoop, and it's about a 1/3rd of the price of buying them at the supermarket!! 


Plus, spices lose their flavour if you don't use them much, so before, that might have meant buying a whole jar, even if you only want 1 teaspoon! So, this new solution is working very well indeed, because we can buy as little as we need for our recipes! 

It was great to get inspiration to turn a simple food jar into a place to keep my spices. These are perfectly functional, and I still like the labels. They're easy to identify, and I've arranged my spices in colour order! :) 

I want/need your help now though! I want to do something to the lids of these jars. I don't really mind them at the moment, but I tried making one of them silver, and it really didn't work. In the absence of money for spray paint and the consideration for food safety, I don't really know what to do with the lids?


Ideas people, I need ideas! Let me know in the comments!


Monday 26 November 2012

The bag dispenser I always wanted

I'm digging out some old photos of a great crafty project. It took me about an hour with the sewing machine, and I love it. It works a treat in our kitchen!


When we moved in 6 months ago, we had plastic carrier bags EVERYWHERE. I wanted a functional but crafty bag dispenser to go in my kitchen, so those plastic bags would not go exploring the insides of my cupboards! 

I went on a hunt for a simple, cheap pattern to make a fabric bag dispenser. Ta Da! I found this lovely design

Off I went, searching through my fabric bits and bobs. This big square of bright green fabric is a thrifted piece - I don't really buy new fabric unless it's on double discount!


I love the brightness of it, and the flowers. The pattern said to cut a 6" x 42" strip of fabric. My piece just happened to be 42" wide. I cut a 7" strip to make it a little wider. 


Then I followed the pattern, sewed up both sides, and added a tunnel for the ribbon to go in. 


I get these bits of ribbon from the fat quarter packs I buy sometimes, and I always save them. Perfect little hanging loop for the bag dispenser. 

First of all, I started out with a cardboard tube for my plastic bags, an idea I found on Pinterest. It didn't work so well. I'll show you a comparison!


The first one I had was just difficult to use, and difficult to refill. Not ideal at all. The new one, however, is brilliant! It goes well with the colours in the kitchen, and matches my tea towels EXACTLY!

I have bright yellow colour pops in mind for my kitchen, but I might wait til we move again to really decide. 


What do you think of my not so new bag dispenser?


Sunday 4 November 2012

Project 333 Season 1 List


I've wanted to write this post since I started Project 333, and now a month into the first season, I'm ready to share my list. The following list is all I'm wearing from October 1st-December 31st 2012. 

I've finally tweaked my list and written up the final version of it (I was supposed to have done this first week of October, oops! P333'ers you'll know what I mean!!). 

Using the collage above as a guide, from top left (moving down by rows):

1. Waterproof jacket
2. Warm coat
3. Long pure wool Icelandic jumper (hand-knitted by my great aunt).
4. Pink lacy scarf
5. Blue cowl
6. Pure wool black shawl (hand-knitted by my grandmother <3 )
7. Pure wool headband 
8. Handbag
9. Pure Icelandic wool gloves
10. Hiking shoes
11. Black flats
12. Blue suede trainers
13. Brown knee-high leather boots
14. Dark grey cowl-neck jumper
15. Light grey button jumper
16. Long colourful dress top
17. Navy floral dress top 
18. Grey short sleeve dress top 
19. Fuschia stripy top, 3/4 sleeves
20. Oatmeal long sleeve top
21. Black cardigan
22. Purple long sleeve top
23. Navy long 3/4 sleeve top
24. Black t-shirt
25. Purple stripy t-shirt
26. Light blue strappy top (excuse the wrinkles!) 
27. Black work trousers
28. Black work trousers
29. Bootcut jeans
30. Skinny jeans
31-33. (not pictured) 1 pair tights, 2 pairs black leggings. 

I made a collage of some of my outfits, if anyone needs some inspiration. I can make so many different combinations with those 33 items, because they ALL go together. Some of the pieces are great for layering too. Here are 4 outfits:


Column 1-2: My go-to weekend/socialising outfits
Column 3: Typical work outfit. I'm lucky that it's business casual. I obviously don't wear it that wrinkly!! 
Column 4: Casual weekend outfit, for grocery shopping etc. 

All the above can also be mixed and matched, to make more outfits! 

I think these are my favourite combinations. Since I started, I have switched out a few that I didn't want to wear, or seemed less practical. My white button down shirt is now reserved for interviews, since the dress code is business casual at work. I am not comfortable in a white shirt, like at all. Luckily, all the clothes above are neat enough to go to work in (except the denim), so I get to use most of my favourite pieces! 


What I've learned from this project:


  • I don't need a lot of clothes to feel good in what I wear. 
  • Sometimes, I wish I had more variety, but I stop myself and remember, "there is more to life than clothes".
  • I feel much better having fewer options. Too many are overwhelming.
  • So far, I almost haven't noticed that I have 33 items total to wear. 
  • I don't want to buy new clothes for a long time. I don't need to. 
  • A simpler life is a better, happier life.


I'll say it again:


A simpler life is a better, happier life