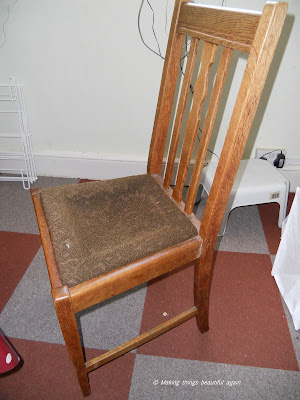
I must say I never envisaged myself tearing off old ugly fabric from a chair and replacing it with something new. Before I tell you how I did it, here are the before and after images:
 |
| BEFORE |
 |
| AFTER |
It's not entirely obvious on the photo, but the seat had fallen through, who knows when. The inner "lines" on the seat are where the fabric dips. Totally not a comfy chair. So the solution was to cover it with a cushion to make it just barely useable. And then the cushion fell apart.
Ok, so I knew about this chair. Then I saw a programme on Channel 4od called "SuperScrimpers" where they just happened to feature a tutorial on re-upholstering sad-looking furniture on the cheap. I then remembered I'd seen a tutorial online somewhere, and went through a few links before I found it again, here.
I got totally excited/impatient/hyper when I discovered that the seat was removable, and that I could probably pull off a little upholstery project. One little issue was that erm... this isn't my chair(!!!) so I knew I'd have to ask my landlady whether she would let me give the chairs a face-lift. Thankfully she approved!!
Aside from the tools for this project, which are an investment because I can use them again, I spent very little on the materials for the first chair. I needed new ply-board for the bottom so the new foam wouldn't fall through the frame. B&Q: 50p. Nice! A visit to the Children's Scrapstore (amazing place! -membership req.) resulted in a foam pad and enough upholstery fabric (from Ikea) to cover all the chairs. That and lots of other things came to £5. Score.
I started straight away because, I'm impatient! Here is how I did it:
The first job was to remove the old upholstery tacks...
Frame exposed, I think these chairs have been upholstered a few times, judging by the holes in it!
I decided to leave the green stuff on because I didn't have anything to replace it with.
The plyboard was missing so I made a template from paper and lined it up on the new plyboard:
A faint pencil mark on the board was enough to saw it.
Then I took some little nails and attached the board to the frame:
In between this photo and the next one I placed this on top of the foam pad and traced around it, and then cut it to the same shape (with a breadknife).
I wanted to practise first with some other fabric before I let loose on the real thing, and I figured it would make it easier if I pulled the foam pad into shape using this fabric.
So then came the lovely green fabric, originally from Ikea. I started by stapling one side with one staple, then the opposite side. Then the same for the two other sides. Next, I stapled in 2 staple increments (working out from the middle of each side) until I'd almost reached the corners.
The corners are probably the hardest bit because I had to get the fabric tight enough, but also follow the shape of the frame, and make sure there weren't any ripples on the side.
Next, the finished product!
I originally planned to sand the frame down and stain the wood a bit darker, but since these aren't my chairs, and I have a limited budget, I decided I'd leave it this time. I'm pretty happy with the result, and the landlady is too - yay!
I have 3 more chairs to do, of which 2 will be done with a maroon fabric, so I will post Part 2 with some more pics soon.
-Linda


