I got the idea for my spice rack from this lovely post.
Here is what I started with:
I've had this arrangement throughout my whole student life, 7 years in total, because it was easy to transport, and pull out of the cupboard to find the spices I needed. But a pile of jars that don't match and have the labels hidden doesn't make it easy to find anything!
I'd seen some cheap jars in Tesco, too bad they contained a "food" that can't really be called food, and I was rather embarrassed walking up to the till with 16 jars of this horrible stuff. Actually, embarrassed is an understatement!
Everything about it. The look, the texture, the smell, the ingredients, was DISGUSTING. I'm glad I saved someone from eating something a cat would turn it's nose up at.
But then I did buy 16 jars of the stuff, and I probably increased the demand for the things 10x. I hope not.
I started by emptying all the jars, straight into food waste, and soaking them in water to remove the labels:
I then sterilised them in the oven at 150C for about 30 minutes.
These jars were the perfect size, and the perfect price for my small budget. At 32p a jar, the embarrassment of buying 16 and the smell from emptying them was worth it to have the spice rack that I've wanted for so long.
Next it was time to make labels. I made temporary labels that can be removed because I wasn't certain that I'd always have the same spices. I wanted these but I was reluctant to spend money, and making your own is always more fun.
I cut out some rectangles from white and black card:
And then wrote the name of the spice in green (herbs), red (spicy spices), and brown (other spices e.g. cinnamon). Excuse the blurry picture next!
I then wrapped them in sticky back film, to protect them from dirt and water. I attached the labels to the jars with blu tack, because I couldn't think of another option.
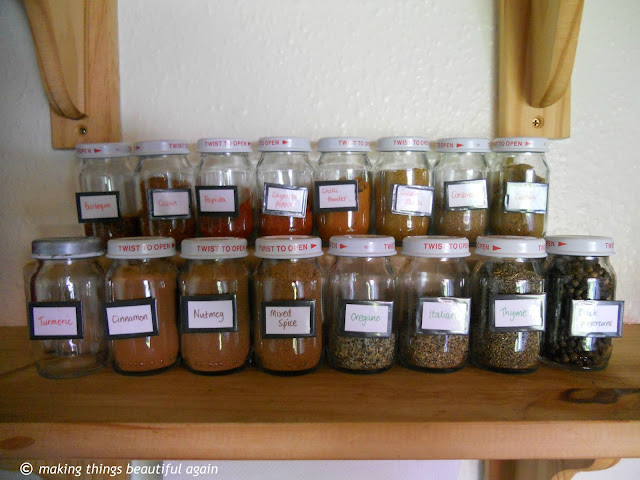
That's enough writing, time for before and after pictures!
The spices are so easy to find, easy to see, and easy to see when we need more. We buy our spices from a brilliant shop called Scoopaway and you can buy just the right quantity by the scoop, and it's about a 1/3rd of the price of buying them at the supermarket!!
Plus, spices lose their flavour if you don't use them much, so before, that might have meant buying a whole jar, even if you only want 1 teaspoon! So, this new solution is working very well indeed, because we can buy as little as we need for our recipes!
It was great to get inspiration to turn a simple food jar into a place to keep my spices. These are perfectly functional, and I still like the labels. They're easy to identify, and I've arranged my spices in colour order! :)
I want/need your help now though! I want to do something to the lids of these jars. I don't really mind them at the moment, but I tried making one of them silver, and it really didn't work. In the absence of money for spray paint and the consideration for food safety, I don't really know what to do with the lids?
Ideas people, I need ideas! Let me know in the comments!


This is such a great idea! I love how you bought cheap jars at a fraction of the cost of buying ones from Lakeland or somewhere. They look really good lined up like that.
ReplyDeleteThank you! I had a look at jars from Ikea, at £2 for 4, but they had plastic lids, and the display models already had cracked lids. So I went with these ones, and they are fine, and close really tight to keep all the flavour in, plus the lids are metal!!
DeleteI like what you've done, Linda, and my first Google search bought up this result, which you could probably replicate using scraps of coloured paper and card:
ReplyDeletehttp://tinyurl.com/btbkbyg
People often wrap jar lids with a cloth (?) so, my next thought is that you could use scraps of wrapping paper left over from Christmas. :-)
You might get the paint to stick better if you scuff the covers up with some fine grit sandpaper.
ReplyDeleteHey Cris, and thanks for visiting! Thanks for the great tip! I'm thinking perhaps metallic paint, maybe spray paint would be best. hmm. choices!
Delete